Tag Archives: cooking

The Secret Word is: Pears

Kalbi (Korean Short Ribs)

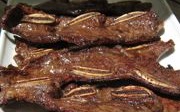
Pictured above: the version without bones.

Pictured below: the version with bones.

There are certain foods or food combinations that give me a food high. Really good pasta with a glass of red wine. Fresh Chesapeake crabs with drawn butter. Kalbi with rice and kimchi. Kalbi is one of my favorite things in the whole entire world.

Kalbi is a Korean dish. It is made with beef ribs that are cut thin, marinated in soy sauce, rice wine vinegar, brown sugar, garlic, ginger, etc. and grilled over a hot fire. In addition to providing amazing flavor, the brown sugar contributes to great caramelization on the meat.

Don’t ignore my recommended side dish: kimchi. Kimchi is fermented cabbage (or daikon radish or cucumber) seasoned with garlic, salt, chile peppers, and other secret spices. Cucumber kimchi is my favorite. Don’t skip the kimchi. The sweet, savory beef needs the tangy, spicy kimchi. Your mouth will thank you for it. Your breath, on the other hand…

A few thoughts before we get started:

  • Use fresh garlic, fresh ginger, fresh (green) onions in the marinade. Don’t even think about using dry or powdered spices.
  • Don’t skip the chopped pear in the marinade. An Asian pear is best. If you can’t find one, use a couple of regular, ripe pears. In a pinch, you can use 100% pear juice. Make sure it isn’t pear-flavored juice.
  • Do not use traditionally cut beef ribs. These aren’t a BBQ-style rack of short ribs. You want thinly sliced, flanken-style ribs which are cut across the bone. Cutting across the bone makes each bone into a little cross-sectional disk (see photo above). The best place to find ribs cut this way is at a Korean market. If you don’t have one of those handy, ask your friendly neighborhood butcher.
  • If you can’t find flanken-style beef ribs, buy boneless ribs (Costco has them). But before you marinate them, you need to make them really thin. Slice the meat into pieces that are 3 inches long and 1/2 inch thick. Then use a meat mallet to flatten them out. This not only tenderizes the meat, it gives it more surface area to absorb the marinade and makes it quicker to cook.
  • The best way to cook this is over a hot charcoal grill. Second best is over a hot gas grill. Don’t cook this in a pan unless it’s a grill pan. You don’t want to boil the meat in the marinade. You want the meat to get a nice bit of char from the dry grill heat.
  • Kimchi is a pain in the butt to make. Unless you’re a Korean grandma with a lot of time on your hands, you do not want to delve into kimchi making. You can find it in a Korean market. Many grocery stores carry it, too. My local Vons has it next to the tofu, soy cheese, etc.
  • Beverage of choice with this: any Korean beer. If you can’t find any, go for some Red Stripe. If you’re under the legal drinking age, skip this bullet entirely.

INGREDIENTS:

  • 1 cup brown sugar
  • 5 cloves chopped garlic
  • 1 tablespoon chopped fresh ginger
  • 1 Asian pear, peeled and chopped
  • 5 green onions, chopped (white and green parts)
  • 1/2 cup mirin (rice wine vinegar)
  • 3/4 cup soy sauce
  • 1/4 cup water
  • 1 tablespoon toasted sesame oil
  • Black pepper
  • 4 lbs beef short ribs
INSTRUCTIONS:
  • Put all the ingredients, except the meat, in a large bowl and stir until sugar is dissolved
  • Add the meat and move it around to coat it in the marinade
  • Cover and refrigerate for at least 3 hours or overnight
  • Alternatively: you can marinate the meat in 1 or 2 big zip-lok bags
  • When you’re ready to grill, remove the ribs from the marinade
  • Grill over a high heat, turning once
  • If you want to make it look pretty, sprinkle some toasted sesame seeds and/or freshly chopped green onions on top before serving
  • Serve with steamed rice and kimchi

Jelly Jelly Jelly

Posted on

Grilled Cheese & Jelly

This one is really delicious and very easy to make.  When you bite into it, it almost tastes like a French pastry.  I don’t know why people aren’t making these things coast-to-coast.

A few thoughts before we begin:

  • Don’t be frightened by the girl from Bad Seed (original version) in the illustration.  She can’t hurt you any longer.
  • This works with just about any combination of cheese and jelly or preserves.  Provolone and grape, brie and strawberry, cheddar and boysenberry, goat and apricot… the list goes on.
  • White bread is delicious but there are other choices out there: try a good wheat bread (not the white bread dyed brown type), challah, pumpernickel, etc.
  • You can make this is in a non-stick pan, a stainless steel pan, a George Foreman Grill (the poor man’s panini press), a panini press (the Italian man’s George Foreman Grill), one of those grill pans, a cast iron skillet, whatever.
  • Don’t be chintzy with the ingredients.  Use a nice amount of cheese, a generous amount of jelly, and feel free to butter the sh*t out of that bread.

INGREDIENTS:

  • 2 slices of bread
  • Butter
  • 1 or 2 slices of cheese
  • Jelly or preserves
INSTRUCTIONS:
  • Heat a pan over medium-high heat.
  • Butter both pieces of bread on one side.
  • Spread a generous amount of jelly on one slice of the buttered bread (on the side you didn’t butter).
  • Place the sliced cheese on top of the jelly.
  • Put the other slice of buttered bread on top of the cheese with the butter on the outside.
  • Put the sandwich into your pan.
  • When it is golden brown and crispy, flip it over.
  • When the other side of golden brown and delicious, take it out of the pan.
  • Eat it.
  • Repeat it.

Smoking is Delicious

Posted on

Smoked Salmon on a Charcoal Grill

I love shellfish. Growing up in Maryland, I looked forward to crab season every year. If I make it back east anywhere close to the season, I almost always have some fresh Chesapeake bay crabs. I will sit at a newspaper-covered table with my mallet and knife and crack open blue crabs until the cows come home. I never get full from eating fresh crabs. It’s always the accompanying beer that does me in.

But with the exception of shellfish (and fish tacos), I’m not much of a seafood lover. For me, the least appetizing item on a menu is almost always the fish, particularly if the word “baked” is in front of it. Baked fish doesn’t conjure up any appetizing images for me. The only things that should be baked are desserts.

When I was in college, I developed a taste for lox. For the uninitiated (i.e., goyim and non-Nordic peoples), lox is thin-sliced, cold-smoked salmon. I love lox on a toasted bagel with cream cheese. Especially if it’s topped with a slice of ripe tomato, a little fresh onion, some capers, and a squeeze of lemon. But I digress…

Regular salmon never appealed to me unless it was covered in Hollandaise. Anything tastes good covered in Hollandaise. It’s kind of like deep frying, melted cheese, or chocolate. It doesn’t really matter what’s underneath or inside. It’s the not-so-secret secret behind the popularity of county fairs.

Then one day, I ordered smoked salmon at a restaurant – it was probably on a plank – and I fell in love. It was moist, smoky, and slightly sweet. Where had you been all my life? When I tried to recreate it at home, I was happy to discover that it is actually very easy to make.

A few thoughts about smoking food:

  • I use my old fashioned, charcoal-powered, Weber kettle grill. I’ve used gas grills and dedicated smokers but I always come back to the Weber. Maybe you have something else that you like better and that’s fine. But I am able to control the heat and smoke on a Weber better than anything else.
  • I usually use hickory chips for the smoke because they carry them in my local Vons. Depending on the food, cherry, apple, oak, and other hard woods work nicely, too. You want to be careful with mesquite, though, because it can overpower your food.
  • Soak the wood chips or chunks in water for about an hour before throwing them on the hot coals otherwise they’ll burn right up. A water-soaked wood chunk will smoke for a pretty long time and not go up in flames.
  • You don’t want billows of thick smoke coming out of your smoker. That will leave your food with bitter flavors. A thin stream of smoke coming out of the vent is perfect.

INGREDIENTS:

  • Whole salmon fillet (I like the ones from Costco)
  • Olive oil
  • Kosher salt
  • Freshly ground black pepper
  • 1 cup brown sugar (this may seem like a lot but it isn’t – some people use twice as much)
  • 3 tablespoons mayonnaise
  • Juice of 1 lemon
  • Dash of Sriracha
  • 1 tablespoon sweet pickle relish
INSTRUCTIONS:
  • Light your coals.
  • Soak your wood chips or chunks in cold water.
  • Combine mayonnaise, lemon juice, Sriracha, relish, and some black pepper in a small bowl until you have a nice sauce. Refrigerate until ready to use.
  • Rinse fillet in cold water and pat dry with paper towels.
  • Rub the fillet lightly with olive oil.
  • Season both sides of fillet with salt and pepper.
  • When the coals stop flaming and ash over, they’re ready.
  • Use tongs or your indestructible bionic arm to move all the coals to one side of the grill.
  • Put the grate over the goals and close the lid.
  • After 2 minutes, open the lid and use a grill brush to scrape the grate clean.
  • Sprinkle half the brown sugar on the fillet and gently rub it into the fish.
  • Turn the fillet over and repeat with the other side.
  • Pour a little vegetable oil over some wadded up paper towels and wipe down the grate.
  • Gently lay the fillet on the cooler side of the grill (away from the coals).
  • Toss some wood chips or chunks on the coals and put the top back on the grill.
  • Make sure the vent is open and try to position it over the fillet so the smoke can draw across the fish.
  • If the smoke stops coming out, toss some more wood chips on the hot coals.
  • After 10 minutes, use a large spatula to carefully flip the fillet over.
  • Replace the lid and smoke for another 10 minutes.
  • Carefully remove the fillet from the grill and place onto serving platter.
  • Serve with sauce on the side.

This Ain’t Olive Garden

Posted on

Linguine Marinara

Spending my honeymoon in Rome ruined Italian food for me. It isn’t that the food in Rome is bad, of course. It’s that most Italian food in America is so horrible. Lest you think I’m a globetrotting snob who thinks he’s too good for the Olive Garden, this was my first and only trip to Europe. Still, it was enough to ruin me for life. And, let’s be honest, we’re all too good for the Olive Garden. Life is too short to eat Bologna Alfredo. I don’t care if it comes with unlimited salad and breadsticks.

Forget about the fancy Italian dishes that we all mispronounce. Let’s stick with the basics: linguine marinara. Why, you ask, is it so hard to find good pasta with tomato sauce? Well, I’ll tell ya. This is another case of something being more about the technique than the actual ingredients.

Linguine marinara should be a really simple dish – and it is. But I’ve eaten it after another cook prepared it using the same exact ingredients and the result was completely different. Often, the other cook (usually my wife – sorry dear) will also notice the difference in taste and will ask me “what else does it need?” as if a pinch more this or a little more that will fix it. I’m sorry to say, it isn’t really about that. It’s about the entire cooking process.

What I really love about the pasta I had in Rome is that it isn’t pasta with sauce piled on top. It’s a marriage of pasta and sauce. It’s like pasta and sauce went through the teleportation machine from “The Fly” only without the fly. It isn’t the way we grew up eating pasta but damn if it isn’t good.

Before we get to the recipe, let’s talk about the process and a little bit about the ingredients:

  1. Tomatoes: Go canned. Common cooking wisdom tells us that fresh is better than canned when it comes to fruits and vegetables. In general, that’s true. However, when we’re talking tomatoes for pasta sauce, it’s another story entirely. It is really difficult to find good, ripe, fresh tomatoes year-round. For consistent flavor, go with canned whole plum tomatoes. Certified San Marzano tomatoes are really good but expensive (Cento is a popular brand). But I’ve gotten really good results with Progresso and, in a pinch, Hunt’s.
  2. Pasta: Stop overcooking it. You know how day-old spaghetti always tastes better? That’s because you’re hung over. Actually, it’s because the sauce has soaked into the noodles. To get the same effect, you want to slightly undercook your pasta (by about a minute or two) and then finish cooking it in your sauce.
  3. Pasta II: No oiling. When I was a wee lad, we always added oil to the pot before dropping in the dried pasta. My mom said it was so the noodles wouldn’t stick together. Sometimes we’d also toss the cooked pasta with some oil before adding the sauce. The problem is that the oil coats the noodles and interferes with the sauce absorption process. If your noodles stick together in the pot, you need a larger pot with more water and/or less pasta.
  4. Pasta III: No rinsing. When I was a mere pup, we would dump the (over) cooked pasta into a colander and rinse it with cold water to cool it off a little. Unless you’re making pasta salad, you do NOT want to do this. Your pasta will become waterlogged and nobody likes a floppy noodle (TWSS). Plus, this also interferes with the sauce absorption process. There’s no room inside the noodle for the sauce to go.
  5. Parmesan cheese: Grate it yourself. Use a block of good Parmesan and grate it right before you use it. Don’t use the pre-shredded cheese that has the texture of fingernail parings. And for heaven’s sake, don’t use one of those shakers of powdered Parmesan that smells like feet (though they’re okay for pizza).


INGREDIENTS:

  • 28-ounce can whole plum tomatoes
  • 1 tablespoon tomato paste
  • 1 yellow onion – diced
  • 2 large carrots – diced
  • 2 ribs celery – diced
  • 2 cloves garlic – thinly sliced
  • ½ cup dry white wine
  • 2 tablespoons extra virgin olive oil
  • Kosher salt
  • Freshly ground black pepper
  • 6-8 leaves fresh basil – cut in ribbons
  • 2 tablespoons unsalted butter (optional)
  • 1 box dried linguine
  • Parmesan cheese


INSTRUCTIONS:

  • Put 6 quarts of cold water into a large pot and place over high heat. Add 2-3 tablespoons of salt and cover. If it starts to boil before your sauce is ready, take the lid off but keep the pot on the heat.
  • Put olive oil into a large sauté pan over medium / medium-high heat.
  • Add the garlic and cook for less than a minute. You do not want to burn or toast the garlic – it will turn bitter. If it burns, throw it out and start again.
  • Add the onions, carrots, and celery. Sweat the vegetables until they are soft and translucent, stirring occasionally, but do not let them brown.
  • Add the tomato paste and stir. Let it cook with the vegetables for a few minutes until it turns a slightly darker red.
  • Put the plum tomatoes into a bowl along with their juice and crush each tomato thoroughly with your hands.
  • Add the white wine to the vegetables and stir, scraping the bottom of the pan. Let it boil for just a minute.
  • Add the crushed tomatoes and juice. Season with kosher salt and black pepper. Let the sauce just come to a low bubble and reduce the heat to low. Stir occasionally.
  • After around 20-30 minutes, use a stick blender and lightly puree the sauce (be careful – don’t burn yourself). If you don’t have a stick blender, use a regular blender and do it in batches. Don’t go crazy blending it to death. A few pulses with the blender should break down the vegetables and tomatoes and give you a nice sauce.
  • Taste the sauce and correct the seasoning if necessary.
  • Cook the linguine according to package directions but stop it 1-2 minutes short of its full cooking time (slightly al dente).
  • Return your sauce to medium / medium-high heat in the large pan. Add the basil (and butter if you like).
  • Drain the pasta and toss it into the pan with your sauce. Let it cook in the sauce for 1-2 minutes, stirring gently.
  • Transfer the finished pasta into a large serving dish and top with a moderate amount of freshly grated Parmesan cheese.

Makes 4-6 servings (depending on how much you eat!)

The World’s Best Burger

Posted on

The other day I had a burger from the drive-thru down the hill from our house. I don’t know why I went there because I hate this particular fast food chain. Their food always gives me a stomachache. Always. I’m pretty sure they serve all their burgers with a side of regret. As I drove away in shame, biting into my burger and trying not to get ketchup on my shirt, I thought to myself: when was the last time I had a really good burger? Unfortunately, it’s been quite a while.

Sometimes, if you want something done right, you’ve got to do it yourself. Unless it’s dental surgery. Or anything involving me and a toolbox.

What makes for a good burger? It isn’t about the stuff you pile on top. It’s mostly about the patty and a little bit about the bun. The patty needs to taste like beef. It needs to have a great sear on the outside and incredible juiciness on the inside. The bun needs to be soft and lightly toasted – preferably in butter. Toasting the bun helps it to stand up to all the flavorful juice coming out of the burger.

Excuse me for a second. I’m drooling again.

Pretty simple. Nothing fancy or special as far as the ingredients. The more I cook, the more I see that it is less about ingredients and more about technique. Don’t get me wrong. I’m not saying you should use crappy ingredients. What I’m saying is a bad cook can easily make really expensive ingredients taste like crap. And a good cook can make even the most humble ingredients into something pretty wonderful.

A few more thoughts before I get to the recipe:

  1. Don’t use lean beef unless you like your burgers dry and tasteless. I get the best results from 20% fat. And don’t even think about using frozen burger patties.
  2. You don’t need garlic powder, seasoning salt, Lipton Onion Soup Mix, Worcestershire sauce, or any other additives. You’re not making meatloaf here. You only need salt and pepper.
  3. When the instructions say to leave the burgers alone for a full three minutes in the pan, it really means to leave them alone. Don’t press on them. Don’t peek underneath them. Don’t even gaze upon them. And only flip them once.
  4. Please don’t use American cheese. It’s not really cheese. Chemically, I think it’s closer to petroleum jelly. I prefer a combo of provolone and cheddar.
  5. Lastly, do not attempt to eat one of these without a pile of napkins handy. Or a roll of paper towels. Lobster bib optional.

INGREDIENTS:

  • 1 pound ground beef (20% fat)
  • Kosher salt
  • Freshly ground black pepper
  • ½ teaspoon vegetable oil
  • 1 tablespoon unsalted butter
  • 4 hamburger buns
  • 4 slices cheese

INSTRUCTIONS:

  • Gently divide the ground beef into 4 equal piles.
  • Very gently shape each pile into a loose patty ½ inch or so thick and 4 inches across.
  • Season the tops of each patty with salt and pepper.
  • Melt half the butter in a 12-inch pan over medium heat.
  • Toast the bun tops in the butter until golden brown.
  • Add the remaining butter and toast the bun bottoms.
  • Wipe out the pan, return it to high / medium-high heat and add the vegetable oil.
  • When the pan just starts to smoke, add the burger patties, seasoned side down.
  • While they’re cooking, season the other side of the patty.
  • For a full 3 minutes: DO NOT TOUCH THE BURGERS.
  • Flip the burgers over.
  • Add cheese and cook for another 2 minutes.
  • Place each burger onto a toasted bun and serve with your preferred condiments.

Makes 4 juicy, messy, delicious burgers.